Sketchup for Interior Design books

Sketchup for Interior Design books
Now Sketchup 2013 for Interior Designers

Monday, March 17, 2014

Lost Trimble

I don't usually express my internal feelings, but I can’t help it this time. I was shocked when I saw for the first time the slow and rigid new 3DWarehouse of Sketchup 14. You can easily guess that behind it are engineers and that the fun people are having less influence. Sketchup is still my favorite program for teaching or designing, but I am upset. What has captivated Sketchup users was its simple and fun program. It encouraged a tacit camaraderie of collaborative work, all contributing to a common purpose. Trimble is leading us in the opposite direction by using the program as an advertisement tool and trying to force us to use it with standardized products. They anticipated that it would be a Sketchup for every profession,  but it turned out that it is not true. Building-Information-Modeling (BIM) is what we have now. The United States, although influential, does not share the same building systems of those with other climates or labor. The question is what will happen with the thousands of end-users outside the USA if they have to spend so much time as I had looking for models or products that are not produced in their countries and are only used in the USA?

I feel that I have been put in a straitjacket designed by engineers for engineers. What happened to the freshness, simplicity and lightness of Sketchup? Finding something now in the 3D Warehouse is even more challenging than before. I don’t like to be induced to use products by any manufacturer or industry. All the presentation in the 3D Warehouse is now square or rectangular. The feel of rigidity is everywhere.

Why do we need more BIM platforms when the construction industry has not recovered yet? Do we really need another BIM such as Revit or Archicad? Why is Trimble looking to develop a program that will lead us to produce similar projects all using the same products? What about the designers and  do-not-do construction? Sketchup had a gigantic market and now it started to being reduced to people that work in the building industry.


Until now I never felt that Sketchup was constraining my imagination or modeling possibilities, but Sketchup 14 shows now the real new direction. I respect engineers, who rely on logical thinking, but design thinking is the gateway to innovation.  People of Trimble, let me tell you that there are other worlds out there. Art, nature, colors and design are elements that make us vibrate and connect with emotions. They are part of our human condition and are even used by every marketing company to make us buy things. Definitively a BIM doesn’t trigger any emotions or innovation.

Monday, November 18, 2013


As I promised I am happy to announce that we have just published “Sketchup for Interior Design Revisited - Course 3. Materials and textures the key for interior design". This title covers all the topics using Sketchup 2013 and it is now available on Amazon and Kindle. The PDF format is available at http://www.sketchup-interior-design.com/interior_design.html and through Sketchucation.

“Training Course 3. Materials and textures, the key for interior design” teaches how to use pictures and components, and create new materials from any picture or swatch that you might have. You will learn to create your own libraries, to modify colors and scales, and use Match Photo in an interior room. Real word textures will be used for finishing, carpets, upholstery and curtains.

The book also covers a couple of useful plugins that can be installed in Sketchup Make or Pro.

The cover image was a contribution of Edward D. Castro, a great visualizer in the Philippines. In a way of expressing my gratitude to him I will donate to the Red Cross 50% of the proceeds of this book to the disaster relief campaign for those affected by the typhoon. Please support me with this cause.

Monday, September 30, 2013

Sketchup for Interior Design Revisited, two new books to master Sketchup 2013

In past May Sketchup 2013 was released. During this time I have concentrated on updating the content of my books to this version although many other authors chose not to update theirs as no substantial changes were introduced. Since the visual environment looks slightly different and some menus have changed I thought that there was a need to rewrite the contents especially for those who have no previous experience in Sketchup. I am happy to announce that we have just published “Sketchup for Interior Design Revisited” - Course 1 and 2. These two titles are now available on Amazon and Kindle. The PDF format is available at http://www.sketchup-interior-design.com.

"Training Course 1. Developing Basic Skills" offers to those that are new in the use of Sketchup 2013 the basic knowledge to draw, edit and manipulate various elements. This book focuses on the fundamentals for the interior design field. "Training Course 2. Acquiring Intermediate Skills" focus on maintaining the geometry of a model under control. Having a disorganized model can be a real headache and this book teaches how to use Groups, Components, Outliner and Layers for those wishing to reach a good end.


I am currently writing the most complex of all the four courses due to the differences between Windows and MAC. This third volume focuses on how to incorporate materials and textures and will be available in two months. Then, How to Communicate Your Ideas in a Convincing Way will be published.

In SketchUp 2013 two things are important to mention: the search and selection of appropriate plugins useful for interior designers through the Extension Warehouse, and creating documentation and presentations by using LayOut. The two first courses only use a couple of plugins as the audience for these two books are primarily students with no previous experience in Sketchup . The books provide information about the two versions offered by Sketchup: Make or Pro

The Extension Warehouse has been incorporating most of the known plugins. However, many of those that I frequently use are not yet showing when I request a search. To fill this gap I installed Sketchucation Plugin Store to complete my search options. Both, Sketchucation Plugin Store and Extension Warehouse as well offer the user a brief description of the use of the plugin and you can also make a search by topic of interest .


Layout includes now a variety of patterns to create architectural drawings. A great benefit for my students has been Speedier Vector Rendering that provides significantly less time waiting for LayOut to vector -render the contents of a model viewport. Another fantastic inclusion has been Numbered Pages in the Pages panel . No more counting down from the top of your Pages panel to figure out which is the page you want to print.

Monday, March 18, 2013

Applying Textures on Round Edges in Sketchup


Completing a couch and put textures on round edges can be a matter of just a few minutes with two essential plugins for interior designers.

The first, called RoundCorner by Fredo performs the rounding of the edges and corners along a 2D profile. The plugin offers three modes: Round Corners, Sharp Corners and Bevel. Also supports round corner concave corners and non-orthogonal edge faces. Corners can have 2, 3, or more edges. This plugin gives users a quick way to make operations that would take much more time with Follow Me native tool.

RoundCorner does not work inside groups or components. It includes an interactive selector which
allows selecting edges by picking them individually or by group, or also by picking faces and vertices. Edges must have exactly 2 faces.

For use:
1. Select the edges you want to round. If you make a mistake in selecting the edge click again. You can also choose a face to select edges.
2. Enter parameters in the menu bar. Enter an offset distance and the number of segments for your new edge. Once having entered the parameters a green check mark will show to execute, click on the screen. You can also use Tab on your keyboard to bring up the Parameters dialog box and then click OK

Note: The Round mode creates much more faces than the Sharp option so be cautious while selecting this option. 

While you get to know how to use the plugin my best advice is to select edges by faces or one by one to control better your final result. Also separate elements into groups or components to avoid sticking edges and to simplify the process of applying materials. In the image below the cushions are components.
Applying materials in Sketchup is pretty straightforward on simple faces or when you have solid colors. However, in cases such as a patterned fabric applied on curved faces matching the pattern can be very time consuming using the native Projected Texture option of Sketchup.

ThruPaint is another plugin offered by Fredo that resides within a suite of tools. Either RoundCorner or ThuPaint are available for free on the SketchUcation forums. I encourage users to make a donation to Fredo’s PayPal account.

The plugin offers three texturing options but not UV mapping.
• Natural UV ensures the continuity of the texture without distortion. UV propagates from the original face painted by their common edges. It is recommended for flat and smooth surfaces.


 • Projected UV  has various choice of projection plane: Given initial plan, view camera, custom faces, and local axes of the model.

• QuadMesh,  requires that you paint the faces arranged as pseudo-quads in a mesh fairly regular. Useful for arches and spheres.

• You can also transfer UV mode (the paintbrush icon colored), where you can substitute a texture with another, without changing the UV.

For each texturing mode, you must select the axis U and V direction flying over the edges of the first surface to be painted. In this example I chose the Natural UV option with a single face selection. I have found that this selection mode let you control easily how to apply the material. The selection mode allows you to chose the face to be painted, which gives you great control over how you want to texture your mesh. You can even dictate to paint only front faces, back faces or both. This mixed with the surface selection modes really speeds up the painting process.

For the sofa arm I started with the top horizontal face and then I dragged the mouse toward the exterior and interior sides to keep the same UV directions and allow the continuity of the fabric.
For the front of the sofa I selected the U and V direction and then I continue dragging to the rounded faces.


After applying textures you can edit textured faces with the following transformations: translation,
rotation, scale (uniform and non-uniform), mirroring, tiling and return home.
For the transformation of texture, you can use the arrows (you can hold down to progressively see
transformation), the VCB, where you can enter an exact value or you can use the visual editor (click when you see the cross Red / Green). 


Wednesday, January 16, 2013

Keyframe, plugin for objects animation


I have recently been evaluating various plugins for animations. I was surprised to realize how often we  interior designers need these. That is why today I bring you two short videos: an aquarium and a kitchen  
cabinet. The list of mobile elements can be extended to a wide variety of settings and include such things as retractable lamps, furniture like a sofa bed, staging, ceilings, vertical partitions, sliding roofs and even shop windows.


The plugins I evaluated are Proper Animation (free), Su Animation and  Keyframe. The one that offers the most functions is Keyframe, and it  is the one I used for my tests and to write this article. The plugin  
is not free, but it’s available on a 10-day trial. It can translate,  rotate and scale an object, animate subgroups/subcomponents, assign  Keyframe transition times and export to a Movie.

The plugin can be downloaded from http://regularpolygon.org/keyframe-animation/ where you can also find easy-to-follow tutorials.

As an example, for the aquarium I used a project I did a long time ago for a seafood restaurant. Unfortunately the project was never built but it helped me in this case to study various possibilities for fish  
movements. The end result still needs some polishing, but it is far enough along to demonstrate its scope and illustrate a combination of translations and rotations. The user need only to generate different groups and then record the initial, the in-between and the final positions.

In this example the fish only rotate around a center.


In this example the cabinet has a combination of rotations and translations to show the Lazy Susan and drawer.


Tuesday, November 27, 2012

New SketchUp 8 book from Bonnie Roskes


A new book by Bonnie Roskes, titled “Conceptualize, Create, Communicate -- Designing Living Spaces with SketchUp,” complements my four-part series, with which  you are familiar.

 Though there is some overlap between her book and my series, there are several differences. As a structural engineer, she has been writing for SketchUp many years, focusing primarily on children in grades K-12.  I am a trained architect and interior designer who has used SketchUp to convey my design ideas and then publish tips on this blog.

To be fair, I asked a student, a reader of my books and a co-worker to contribute their opinions about Bonnie’s book.  We all agreed on two points.

First, Bonnie targets interior decorators and furniture manufacturers more than interior designers and architects. Many of the examples are how to model tables and sofas while the 3D Warehouse offers thousands of objects of this type.  Interior design demands much more, although I think knowing how to model furniture is very useful .

Second, my fellow reviewers felt that omitting a single click can be frustrating and found that my step-by-step style makes it easy for a beginner to master the program.  During my 15 years of teaching computer programs I have found that my procedure -- incorporating concept applications into memory -- is the correct path to using the software to create new projects.  It allows each person to learn in his or her own way.  

Bonnie’s book is interesting in many ways and applies modeling concepts without going into detail about each click.  This is not my way but it is still useful to know different procedures.  Bonnie’s methodology leaves open the directions to an intermediate level, and sometimes previous knowledge is needed.

The title Bonnie chose for her book led me, and my fellow reviewers, to expect spaces rich with ideas on how to use Sketchup for interior designers. But it does not prove as helpful to architects and designers. Architects are responsible for designing aesthetically and making sure that the objectives are the end-use of the building. Engineers are responsible for applying the principles of engineering science, mathematics and physics to their design projects. When engineers attempt to design aesthetically they often come up lacking.

The spiral binding makes manipulation of the book very easy and allow readers to make notes. At the end of each chapter a Model-It-Yourself section is offered where the reader can strengthen the acquired concepts. 

In the end, there are many readers, different ways to learn and a variety of writing styles.  Bonnie’s book will appeal to many.


Friday, November 2, 2012

Carving and Moldings in Sketchup

When we have to refer to elements that enrich our interior spaces we cannot forget of moldings and carving. There are many plugins that can help you to define a geometry to use in this kind of details. Today I will show a simple tutorial by creating a fireplace.

I know that not many SketchUp users take advantage of the Solid tools, but believe me, it’s amazing what you can achieve with them.  This is the final model of the fireplace. Note the carved flutes on both sides.

This is the way I did it:

  • I defined a flat face and a path.
  • I used Weld plugin to convert the disconnected edges of my curve into one entity. In this way I don’t see the edges on the curved surface.
  • Next, I used the Extrusion Tools by TIG to create the flute. 


  • I took the profile of the jamb and with the Push/Pull tool I completed the geometry. I converted it into a group to use it in a later step with the Solid tools.
  • I placed three flutes on top of the jamb. 
  • Check that you are in presence of volumes through the Entity info window, otherwise the Solid Tools can’t be used. 
  • Using the Subtract option, I took away one by one the flutes from the jamb to get this result
  • I used the Follow Me tool to complete the mantle and the frame 
Finally, I brought together all my groups to complete the fireplace.


Thursday, September 20, 2012

Designing Kitchens with SketchUp, a new book for interior designers


This nine chapter, 221 page masterclass is the ultimate Step by Step Tutorial guide for anyone wishing to get the grips with kitchen design using SketchUp.


Adriana's guide covers all aspects of kitchen design in an easy to follow hand holding fashion from 'Good Practice' to 'Preparing your construction documents' with Layout and everything in between the kitchen designer needs to know.

Many kitchen designers have used specialized software to make designs fairly quickly. The main benefit of this type of software is its catalogue of kitchen cabinets, as well as the instant pricing information. However, SketchUp is a very powerful tool that can be used for this type of task. SketchUp contains vast library collections that can be found in the 3D Warehouse, the low-cost investment in software needed (even free), and versatility of designs and materials available to apply on surfaces. Any custom design can be approached in a simple way, and designers can grow their own libraries for future use.

The reader will learn how to drag and drop cabinets, use plugins to create new components, how to create your own dynamic components with the ability to change size, material and dimensions or create a fast design using pictures or images. Tiles, backsplashes, countertops and a quick exploration adding lighting effects to designs with freeware and shareware alternatives will complete the knowledge you need to succeed in your daily professional life.

The book is available in Amazon in paperback and Kindle format. The PDF format can be purchased in http://nextcad.net/sketchup-interior-design-book.html or through Sketchucation website.

Friday, August 17, 2012

The Best Way To Reach An Interior Space


Separating the outer shell of the interior space through the creation of groups is an alternative to control the visualization of an interior space. Creating a group with the walls and another one with the ceiling will allow you to hide at will these items when in the presence of an interior space.

However, this is a good approximation only when you have a simple geometry. In the presence of more complex spaces or overlapping elements, as in these pictures below, combining the option of separation of groups with the Section tool is the most efficient way to access an interior space.


The Section tool is an invaluable resource not only for accessing an interior space but as a technique to simulate an animation of a construction process or a space exploration.

To use the Section tool, place the rectangle on any existing item on the desired plane of section, and click. To align the view with the plane of the section right-click> Align View. To hide the section plane select the Display Section Planes option.


Once the view and the created section are aligned, you can create a scene to return to the same interior point each time you need it. Creating multiple sections will also give you the advantage of showing parts of your project as an animation. For example, if you place two parallel sections, the first located at a back point of a room and a second located just before the outer wall, going from one scene to the other will show an animation of the space between the two sections.


With the Section tool you can reach any point of the geometry without having to change the field of view. You can use the Walk and Position Camera tools without any restrictions. You can also use it in perspective mode to show extremely small spaces or to select a parallel view to create an elevation. Another benefit is that you can take the points of the plane of section to place dimensions.

Anytime you are designing, the tool section is the most practical and easy way to access any interior space and create the best camera view and perspectives.


Thursday, July 19, 2012

Backgrounds and Landscape Views in Sketchup


How to place an image map (jpg) as a sky or environment background inside SketchUp model? This key words search appears constantly in this blog. As many know adding a background to your SketchUp model allows you add image files to your model and position images such that they act as a background.

The way to do it is to save the image to your computer. In SketchUp go to Window > Styles, and choose "edit" in the choices. Select "Watermark" option. Click the "+" sign to add a photo as a Watermark/Background. There is a step through wizard to let you choose different settings.

The issue with this procedure is to find a good sky/background photo you can use. And when I say “good” means that it has to have the same eye level as your model otherwise you will need to move your model up and down to adjust it to the image in the background. Beside this problem if you want to create an animation or look around the image will stay static while your model will vary its position. Below you see an image that explain these drawbacks. If you use the Look Around tool the model will move but the background will not follow it. So this trick has not worked for me especially when I work in an interior space.


An important variable in interior design is the relationship with the environment and the views we have of it from an interior space. Sometimes we can take photos on site and sometimes we need to use panoramic images to show our proposal for a project. If our project is on floor 30 we may need to place the skyline of a city but if we are designing for a glass house the eye level will be completely different.

So here are my tips

In case I can take pictures on site: I take several pictures of the background and then use stitching software to combine them in a panorama. I save it in my computer.

I create a cylindrical shape to wrap my model enough to cover the interior views. If I have just a flat window on one wall the curvature will be much less than if the interior space has views around like this example.

I create a texture and I apply it on a flat face. I adjust its position using fixed pins and specifying it as “Projected”. Be aware to align the flat face with the width and height of the rounded shape to avoid distortions of the picture or a tiled result. I sample the texture on the flat face and I apply it on the cylindrical one.


I create a scene with the interior view I want to show setting the eye level as I need it. Note in the picture   
below that the background is too high compared to the site view (the project had a considerable difference between the pool level and the garden).

To adjust it I move the circular shape in the blue direction until I am satisfied with the result.


Now I can use the Look Around tool and the background will follow my model.
Note: If you need a 360 degrees background you can have a complete cylinder to walk around inside or outside the model.


Tuesday, June 26, 2012

Flipping or Mirroring + Copy. Use these commands to keep object’s face count low and accelerate your modeling

Flipping and mirroring can be used when you want to repeat an element in the opposite position, but these tools are also very useful when you want to model symmetrical objects. Modeling half of an object has several advantages. It reduces the geometric entities; it takes half the time to complete items such as chairs, beds, sofas and tables; and the changes applied on components will be reflected in the mirrored copy.

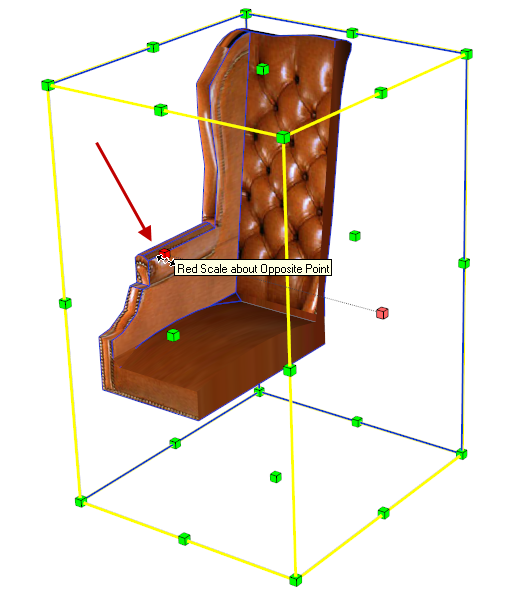
I am using a presidential chair to illustrate this concept. To model half-chair I used a Photo Match function that allowed me to complete it in a few minutes. Mirroring allows you to duplicate that half to create the rest of the model.

There are two features that can be used for this procedure.

The first is to use the Scale tool by pulling a grip toward and then beyond the point about which you are scaling. This operation allows you to pull geometry inside out. Note that the grips snap to certain negative values (such as -1, -1.5, and -2) just as they do in the positive direction. You can force a mirror by typing in a negative value or dimension.

1. Select the object and make a copy.
2. Choose the Scale tool.
3. Pull geometry inside out. Note that the grips snap to certain negative values. Type  -1.
4. Move the second half into position and use Shift+Erase to hide the edges.


The second way to achieve the same result is by using the Flip Along operation.

1. Duplicate the object.
2. Context-click on the geometry.
3. Select the Flip Along context menu item.
4. Choose the axis for the flip. Tip: if you are moving the object along the red axis, the green axis will be the mirror line. In that case flip along green; same using the other axes.  
 5. Move the second half into position and use Shift+Erase to hide the edges.


Friday, May 25, 2012

Using textures with alpha-transparencies in SketchUp

Textures with transparent background can provide an inexhaustible source of possibilities for photomontages of any kind, from an iron fence to a curtain.

To get an image with alpha channel you need help from an editing software. When you open an image in any of these programs that has a one color background you can use the Magic Wand to select it. Use the Cut tool and save the image as a PNG or TIFF that are the only formats that will allow you an alpha transparency – background defined as transparent – in SketchUp.

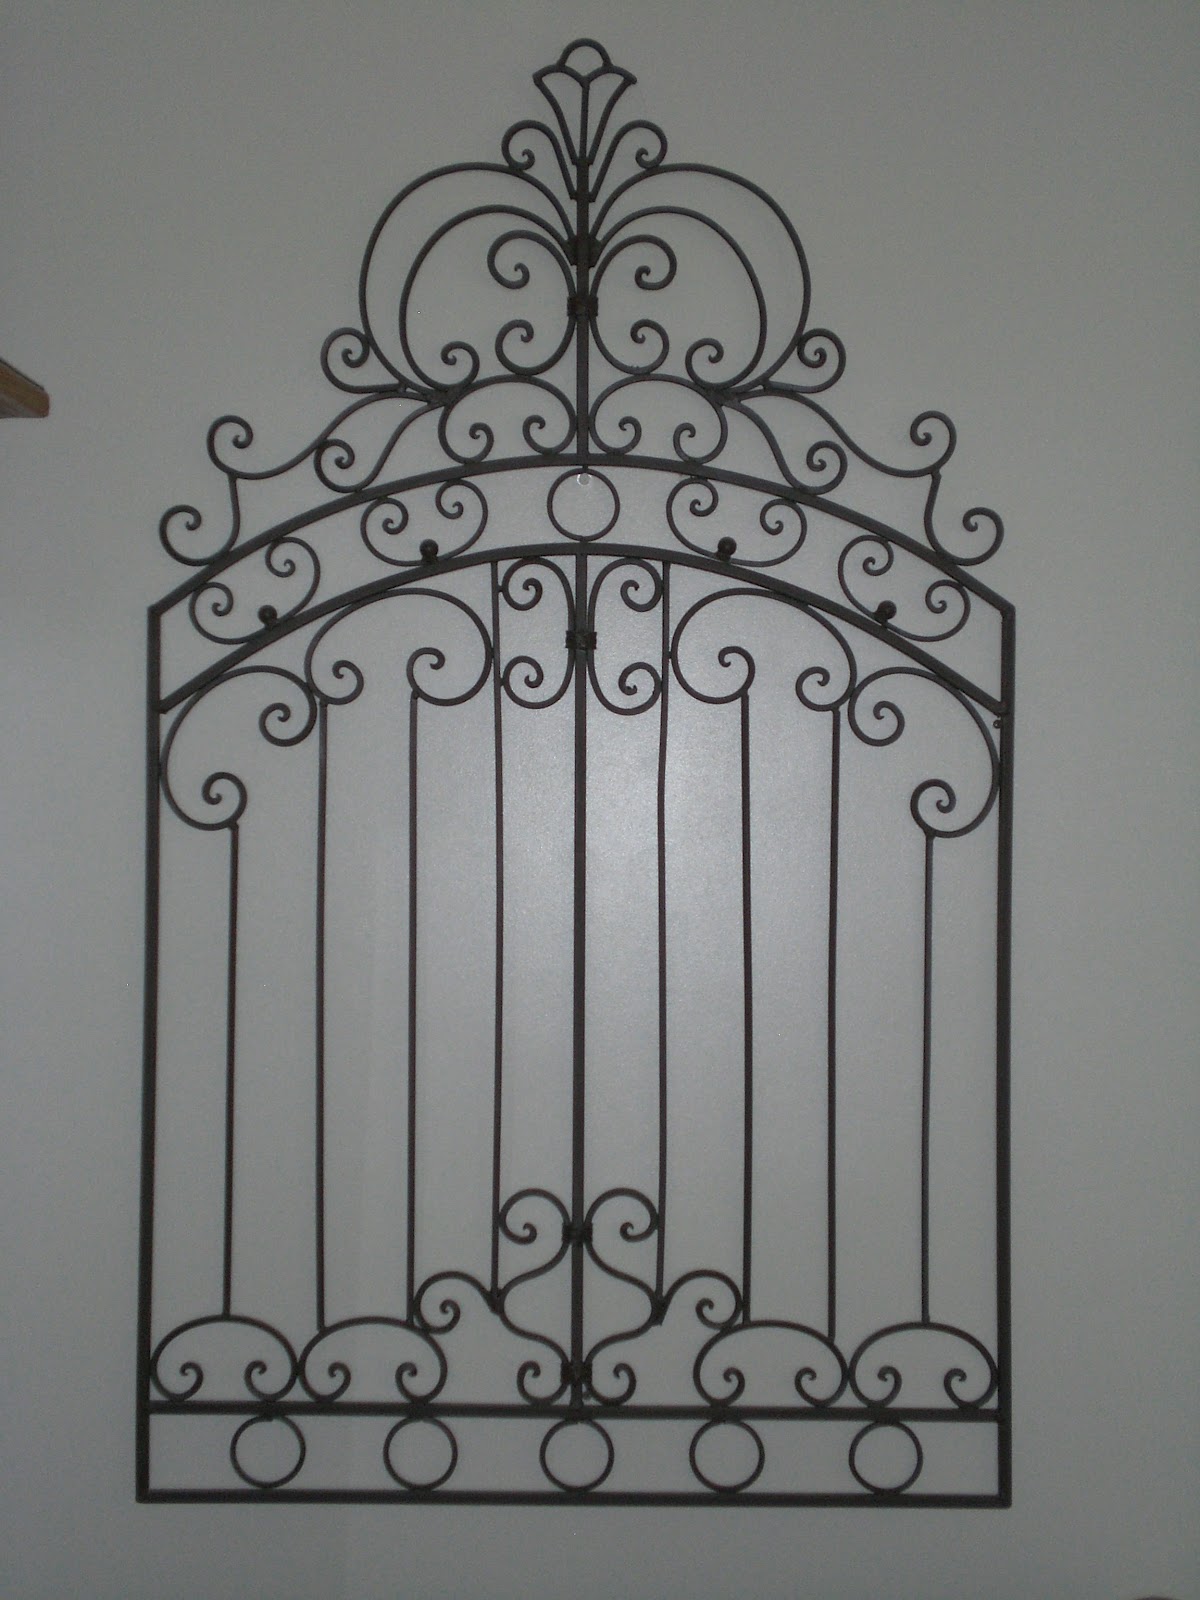
I always tend to use textures when modeling can be too much time consuming or when I want to keep the face-count low. In this example I will use an iron gate to explain the steps that you have to follow.

The first step is to take or find a picture in a front elevation to avoid any picture distortions. Then cut the background with a photo editor and saved it in PNG/TIFF format.


In Sketchup create a new material using the new alpha texture and applied it on a face. You can see in this picture the interior of the wall denoting the transparency.


Erase and resize the area to have just one tiled texture with the appropriate dimensions and create a component. Once you finish the rest of the geometry  edit the gate component and with the Shift+Erase tool hide the edges of the face.