Sketchup for Interior Design books

Sketchup for Interior Design books
Now Sketchup 2013 for Interior Designers

Thursday, September 20, 2012

Designing Kitchens with SketchUp, a new book for interior designers


This nine chapter, 221 page masterclass is the ultimate Step by Step Tutorial guide for anyone wishing to get the grips with kitchen design using SketchUp.


Adriana's guide covers all aspects of kitchen design in an easy to follow hand holding fashion from 'Good Practice' to 'Preparing your construction documents' with Layout and everything in between the kitchen designer needs to know.

Many kitchen designers have used specialized software to make designs fairly quickly. The main benefit of this type of software is its catalogue of kitchen cabinets, as well as the instant pricing information. However, SketchUp is a very powerful tool that can be used for this type of task. SketchUp contains vast library collections that can be found in the 3D Warehouse, the low-cost investment in software needed (even free), and versatility of designs and materials available to apply on surfaces. Any custom design can be approached in a simple way, and designers can grow their own libraries for future use.

The reader will learn how to drag and drop cabinets, use plugins to create new components, how to create your own dynamic components with the ability to change size, material and dimensions or create a fast design using pictures or images. Tiles, backsplashes, countertops and a quick exploration adding lighting effects to designs with freeware and shareware alternatives will complete the knowledge you need to succeed in your daily professional life.

The book is available in Amazon in paperback and Kindle format. The PDF format can be purchased in http://nextcad.net/sketchup-interior-design-book.html or through Sketchucation website.

Friday, August 17, 2012

The Best Way To Reach An Interior Space


Separating the outer shell of the interior space through the creation of groups is an alternative to control the visualization of an interior space. Creating a group with the walls and another one with the ceiling will allow you to hide at will these items when in the presence of an interior space.

However, this is a good approximation only when you have a simple geometry. In the presence of more complex spaces or overlapping elements, as in these pictures below, combining the option of separation of groups with the Section tool is the most efficient way to access an interior space.


The Section tool is an invaluable resource not only for accessing an interior space but as a technique to simulate an animation of a construction process or a space exploration.

To use the Section tool, place the rectangle on any existing item on the desired plane of section, and click. To align the view with the plane of the section right-click> Align View. To hide the section plane select the Display Section Planes option.


Once the view and the created section are aligned, you can create a scene to return to the same interior point each time you need it. Creating multiple sections will also give you the advantage of showing parts of your project as an animation. For example, if you place two parallel sections, the first located at a back point of a room and a second located just before the outer wall, going from one scene to the other will show an animation of the space between the two sections.


With the Section tool you can reach any point of the geometry without having to change the field of view. You can use the Walk and Position Camera tools without any restrictions. You can also use it in perspective mode to show extremely small spaces or to select a parallel view to create an elevation. Another benefit is that you can take the points of the plane of section to place dimensions.

Anytime you are designing, the tool section is the most practical and easy way to access any interior space and create the best camera view and perspectives.


Thursday, July 19, 2012

Backgrounds and Landscape Views in Sketchup


How to place an image map (jpg) as a sky or environment background inside SketchUp model? This key words search appears constantly in this blog. As many know adding a background to your SketchUp model allows you add image files to your model and position images such that they act as a background.

The way to do it is to save the image to your computer. In SketchUp go to Window > Styles, and choose "edit" in the choices. Select "Watermark" option. Click the "+" sign to add a photo as a Watermark/Background. There is a step through wizard to let you choose different settings.

The issue with this procedure is to find a good sky/background photo you can use. And when I say “good” means that it has to have the same eye level as your model otherwise you will need to move your model up and down to adjust it to the image in the background. Beside this problem if you want to create an animation or look around the image will stay static while your model will vary its position. Below you see an image that explain these drawbacks. If you use the Look Around tool the model will move but the background will not follow it. So this trick has not worked for me especially when I work in an interior space.


An important variable in interior design is the relationship with the environment and the views we have of it from an interior space. Sometimes we can take photos on site and sometimes we need to use panoramic images to show our proposal for a project. If our project is on floor 30 we may need to place the skyline of a city but if we are designing for a glass house the eye level will be completely different.

So here are my tips

In case I can take pictures on site: I take several pictures of the background and then use stitching software to combine them in a panorama. I save it in my computer.

I create a cylindrical shape to wrap my model enough to cover the interior views. If I have just a flat window on one wall the curvature will be much less than if the interior space has views around like this example.

I create a texture and I apply it on a flat face. I adjust its position using fixed pins and specifying it as “Projected”. Be aware to align the flat face with the width and height of the rounded shape to avoid distortions of the picture or a tiled result. I sample the texture on the flat face and I apply it on the cylindrical one.


I create a scene with the interior view I want to show setting the eye level as I need it. Note in the picture   
below that the background is too high compared to the site view (the project had a considerable difference between the pool level and the garden).

To adjust it I move the circular shape in the blue direction until I am satisfied with the result.


Now I can use the Look Around tool and the background will follow my model.
Note: If you need a 360 degrees background you can have a complete cylinder to walk around inside or outside the model.


Tuesday, June 26, 2012

Flipping or Mirroring + Copy. Use these commands to keep object’s face count low and accelerate your modeling

Flipping and mirroring can be used when you want to repeat an element in the opposite position, but these tools are also very useful when you want to model symmetrical objects. Modeling half of an object has several advantages. It reduces the geometric entities; it takes half the time to complete items such as chairs, beds, sofas and tables; and the changes applied on components will be reflected in the mirrored copy.

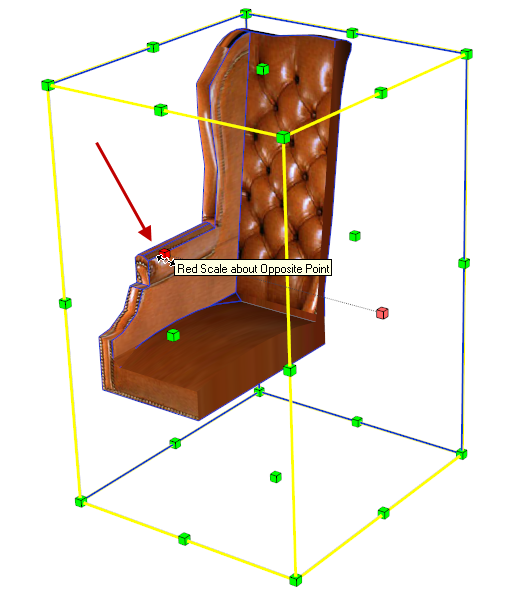
I am using a presidential chair to illustrate this concept. To model half-chair I used a Photo Match function that allowed me to complete it in a few minutes. Mirroring allows you to duplicate that half to create the rest of the model.

There are two features that can be used for this procedure.

The first is to use the Scale tool by pulling a grip toward and then beyond the point about which you are scaling. This operation allows you to pull geometry inside out. Note that the grips snap to certain negative values (such as -1, -1.5, and -2) just as they do in the positive direction. You can force a mirror by typing in a negative value or dimension.

1. Select the object and make a copy.
2. Choose the Scale tool.
3. Pull geometry inside out. Note that the grips snap to certain negative values. Type  -1.
4. Move the second half into position and use Shift+Erase to hide the edges.


The second way to achieve the same result is by using the Flip Along operation.

1. Duplicate the object.
2. Context-click on the geometry.
3. Select the Flip Along context menu item.
4. Choose the axis for the flip. Tip: if you are moving the object along the red axis, the green axis will be the mirror line. In that case flip along green; same using the other axes.  
 5. Move the second half into position and use Shift+Erase to hide the edges.


Friday, May 25, 2012

Using textures with alpha-transparencies in SketchUp

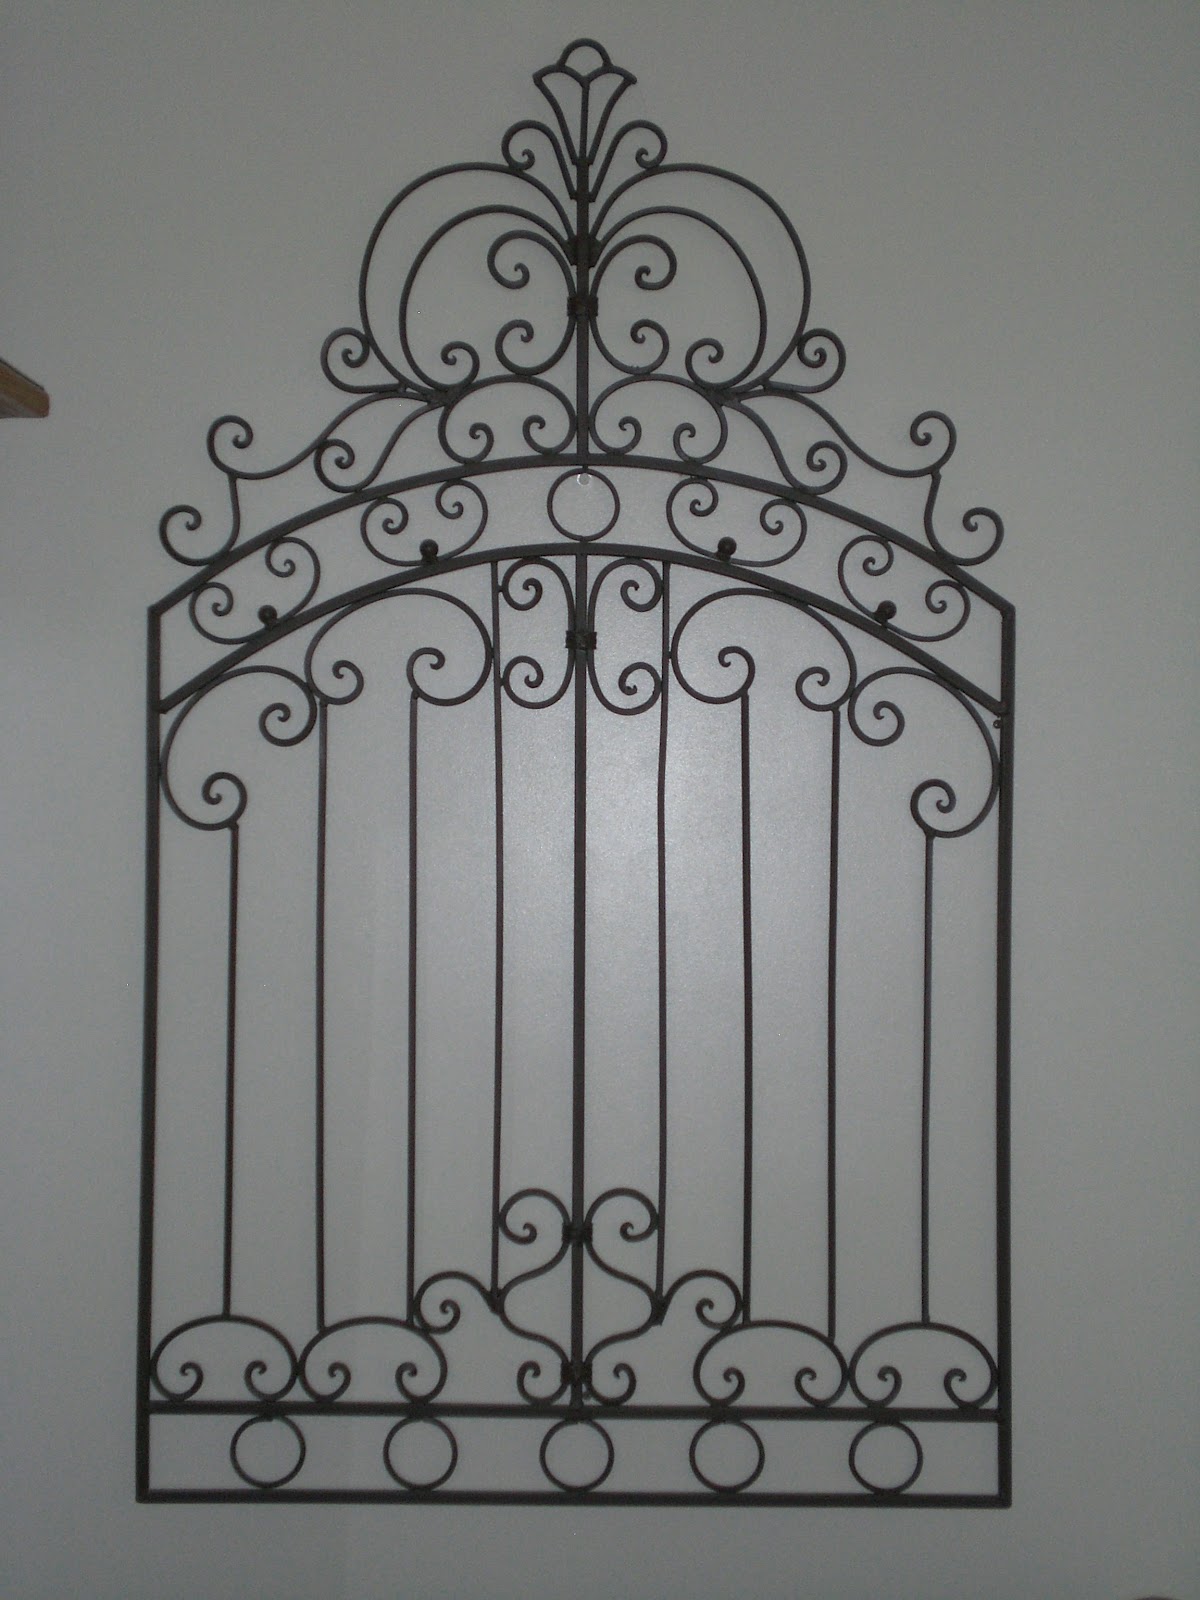
Textures with transparent background can provide an inexhaustible source of possibilities for photomontages of any kind, from an iron fence to a curtain.

To get an image with alpha channel you need help from an editing software. When you open an image in any of these programs that has a one color background you can use the Magic Wand to select it. Use the Cut tool and save the image as a PNG or TIFF that are the only formats that will allow you an alpha transparency – background defined as transparent – in SketchUp.

I always tend to use textures when modeling can be too much time consuming or when I want to keep the face-count low. In this example I will use an iron gate to explain the steps that you have to follow.

The first step is to take or find a picture in a front elevation to avoid any picture distortions. Then cut the background with a photo editor and saved it in PNG/TIFF format.


In Sketchup create a new material using the new alpha texture and applied it on a face. You can see in this picture the interior of the wall denoting the transparency.


Erase and resize the area to have just one tiled texture with the appropriate dimensions and create a component. Once you finish the rest of the geometry  edit the gate component and with the Shift+Erase tool hide the edges of the face.

Thursday, May 3, 2012

Trimble/Sketchup acquisition

One week has passed since news broke of the acquisition of SketchUp by Trimble. I have spent many hours reading, analyzing, and why not say, having fun with the speculation. Many stories are full of testosterone and some are already up in arms. Actually I have a more optimistic vision that many and I want to share with you my personal opinion.

Trimble is no stranger to 3D modeling. Obviously it is looking to expand their existing market. Their experience in the construction industry can add value to an interesting future development of SketchUp.

On the other hand SketchUp has many valuable assets that I do not believe that Trimble will overlook.

• SketchUp has become popular because it clearly sets apart from any CAD system. It is intuitive, easy to learn, inexpensive (or free) and can be applied to any number of disciplines from geo-modeling to film making.
• It relies on the 3D Warehouse, the on-line repository to which the community contribute selflessly. It is invaluable to count with any type of libraries; even more is the ability to collaborate and share 3D models with anyone in the world or allow companies to show products of any kind.
• Access to a free community of developers that expands the work of the development team. Many plugins have allowed SketchUp to acquire complex abilities in modeling, BIM and renderings.
• A development team that has been at the forefront for many years. It was confirmed that most of the SketchUp team has agreed to continue working with Trimble. Knowing that the team that has brought up Sketchup to these days is still standing, brings peace of mind.
• However, what also makes SketchUp a unique product is not technology, but its community. It has 30 million users who are real passionate fans and are proud of the program.

With all these assets why would Trimble only make an engineering program for engineers? Trimble is a company that has grown steadily. It would make sense to shrink the purchased assets? They have expressed that they wish to carry SketchUp to the next level maintaining its existing functionality. The fact that changes will be incorporated, it does not necessarily mean it will remain exclusive of certain disciplines. As John Bacus –project manager of Sketchup- said “But this doesn’t mean SketchUp will be any less useful for folks outside that industry – one of the greatest things about SketchUp is its horizontal “3D for Everyone” appeal. We’ll never change that”. Any system is capable of being applied to a variety of needs beyond the initial concept for which it was created.

Google's mission worked in modeling the earth, irrelevant factor for interior designers; but this direction did not prevent the program could be used in many different other disciplines.

News reports indicate that Trimble and Google will combine their forces to keep the 3D Warehouse. This means that the visualization of models will continue to be present even for those who work in interior design. Therefore the contribution of the end-users will continue to live and current.

Paradoxically, what makes some people feel fear is the uncertainty of running a new roadmap with no maps or GPS (Trimble is involved in mapping and GPS technology)

For me, the value of Trimble in engineering and construction combined with the ability of Sketchup to display projects from early stage, its concept of non-CAD together with the 3D Warehouse and the great mass of users, have the potential to cover the AEC market like no other company has done so far. Anyway, we will have to wait. For now I don’t believe we will see dramatic changes during 2012; at least they don’t expect revenues coming from this acquisition.

Monday, April 16, 2012

Stairs in SketchUp

Although the stairs are utilitarian elements are often a focal point in the interior space. To create stairs with Google Sketchup is not difficult but it can sometimes take a long time and when not to say, somewhat repetitive and boring. That is why today I will show you 3 types of ladders made ​​with the Stair Maker plugin by Sdmitch that streamlines the process incredibly. The plugin is available in sketchucation.com

The plugin creates 4 types of stairs: Normal, Spiral (which is awesome to have this possibility), U-shaped and Ladder. The plugin offers different parameters which vary the thickness of the tread, wide, high and even angles.

In this post I will show you four stairs starting from the alternatives offered by the plugin and then modified. The first step shown below was made ​​by combining the options Normal and Ladder, using 1.5" Step Depth variable for separate steps.
To create the handrail and stringers it was taken advantage of the basic lines drawn by the plugin using the plugin Taper Maker by G. Terry Ross, at http://www.drawmetal.com/. This plugin let you align a face perpendicular to a path and so the tubular sections were completed.

This picture shows the components and plugins used for each.

The second step was done using the alternative Spiral with an angle of 30 degrees for each tread.
The previous design actually consists of 2 stairs to which were applied the Flip Along command to change the direction of the Run. In the below image the stair has a step angle of 15 degrees and a step depth of the same height as the rise.
The third stair seems complicated though by the curves but it was very easy to create it using the Normal option and Solid commands. These are the steps:

  1. Create the stair with the Normal alternative.


2. Apply the Outer Shell command from the Solid tools to create a geometry with volume properties.


3. Create a second solid, to apply Subtract from the Solid tools to the Normal stair.
4. Subtract the curved volume using the Subtract function of Solid tools

5. Create another volume for the end of the last two or three steps and apply Outer Shell or Union of the Solid tools.
6. With Shift + Erase hide unwanted lines.

7. Taking advantage of certain lines created initially for the rail the rest of the geometry was completed. For the straight rail the plugin Balustrade with Components by TIG was used. A component was created for balusters using the Follow Me tool. Taper Maker plugin was used for the curved handrail. This image shows the plugins used for the creation of the rail.

I hope these tips can boost your imagination up next time you face to create a nice stair.